How to Make Photos With Camera Long Exposure Photography Techniques
How to make a photo with the camera’s long exposure photography technique
mrfdn – Long exposure is actually just one of the basic techniques in photography.
Where the camera is placed on a tripod and then does a slow exposure such as 10 seconds, 30 seconds, 1 minute, 4 minutes, or longer.
The use of long exposure techniques is usually applied when taking landscape photos.

Taking long exposure photos requires several main tools, namely an nd (neutral density) filter.
The function of the filter is to reduce several stops of light entering the camera.
Also read: Learn to take landscape photos
Why use long exposure?
According to me,
- With this technique you can learn the stops on the camera.
- By understanding the stop in the camera system, you will really appreciate how important 1 stop in exposure is every time you shoot. Just imagine if you have to add 1 stop of 2 minutes of exosure, then the result will be 4 minutes. How long does it take to produce 1 photo frame that we will do with our camera.
- By understanding long exposure techniques you will be more creative to make interesting photos.
- Long exposure photos can add mood to your photos.
Read more about the article: Mood in long exposure photos
How to take long exposure photos
Before taking photos with long exposures, consider the following:
1. The main subject of the photo must be steady
This means that the main subject remains frozen / does not move at all. While other objects still move naturally.

2. Do it in the open and compose photos by showing supporting objects as evidence that the technique used is a long exposure technique.
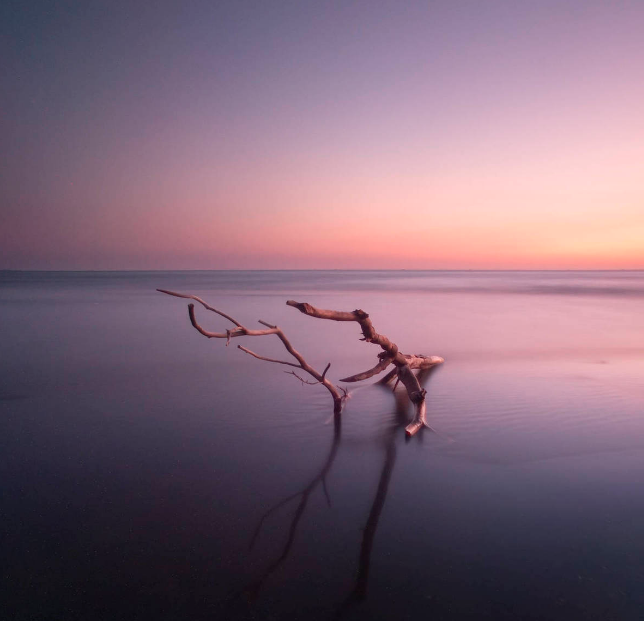
That is, when you take a photo on the beach, the moving waves are a supporting object. And the waves will look smooth when using this long exposure technique. It’s different when we use the usual technique where the waves will look frozen. In addition to the waves, clouds are also a suitable supporting object for long exposure photos.
Also read :: The right time for long exposure photos
3. Use a good quality nd filter to get normal photo color results. The color of a photo that is not normal by the use of an nd filter that has poor quality is called a color cast.
4. Use a sturdy tripod
Now how to set the camera for long exposure mode
1. Use the lowest ISO available on your camera. Generally the camera has iso 100.
2. Use a small aperture starting from f/11, f/16, stuck at f/22. My favorite is at f/11 because the average lens has maximum sharpness at this aperture.
3. Use raw files, with additional options jpg fine, or high.
4. Turn off the long exposure noise reduction mode on your camera.
5. Now compose your photo. Determine the main subject. The main subject must stand out. Don’t let other objects dominate in your photo.
For further details, please read the article :: Maximizing the composition of landscape photos
6. Take 1 normal shot. This is your reference in determining the speed that will be used later. For example you get an exposure of 1/60, f/11, and iso 100
7. Install the nd filter that you have. The nd filter with the square type will be easier than the thread nd filter. For example, you use the nd 1000 filter which can reduce exposure to 10 stops.
8. Calculate the speed used. With the exposure data obtained above, let’s calculate the speed that will be used in the long exposure mode camera settings. With a speed of 1/60, you have an nd with a decrease of 10 stops then the way to calculate the speed is like this. For every one stop decrease, the number is just multiplied by 2 or half of the previous number.
1/60, 1/30, 1/15, 1/8, 1/4, 1/2, 1″, 2″, 4″, 8″, 15″. 
The speed used from the initial exposure data was 15 seconds. Hmm.. It seems that it’s still not long. If you want a 30 second exposure, then you can lower it one stop from a smaller aperture, namely at f/16.
If it’s still not long enough, you can simply replace your nd filter with an nd filter that has more density, for example nd 13 stops.
Or install another nd filter in front of the 1000 nd filter earlier. For example with the nd little stop which has a density of 6 stops. Then you can lower the stop to 16 stops.
9. Press the shutter button, use the remote shutter to suppress the vibration.
The final word
After you take a photo, review the results on your computer. Then do the editing as you wish. Hopefully this article is useful.
How to take long exposure photos like Torture Camera
Post a Comment for "How to Make Photos With Camera Long Exposure Photography Techniques"