4 Ways to Lighten a Dark Side-by-side Photo with Photoshop
The reason may be because the position of your object with the direction of the light is not quite right. So that the shadow that falls right next to the object, which is usually also called the shadow.
Well, in this article I want to give tips on how to brighten up dark photos next door.
Maybe the results can not be as good as when photographed properly.
Lack of photo editing to brighten dark areas
This you need to know before doing photo editing.
If your photo is too dark, it is impossible for the dark area to be bright with good quality.
There are even photos that are not good.
Usually appears noise when the shadow area is lifted.
What is noise?
In short, noise is the red, blue, or white spots that appear in the image because dark areas are forced to lighten.
Well, we have to avoid this noise when editing later.
So, try to have a normal photo file first before editing a photo, so that when editing we don’t lose a lot of detail.
How to lighten dark photos with Photoshop
In Photoshop you can use several tools such as curves, levels, brightness and contrast and shadow/hightlight.
This is an example of a photo to be brightened.

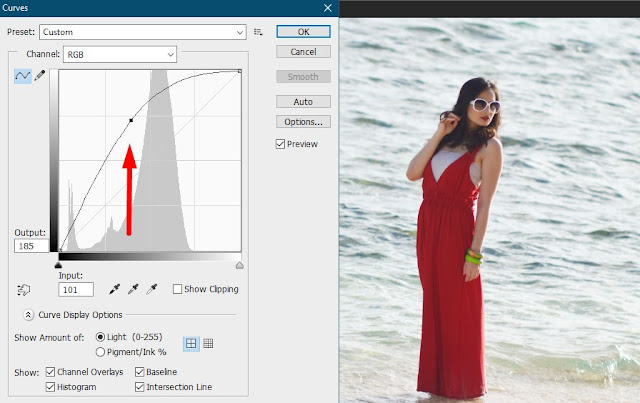
1. Curves
Open the photo in Photoshop, then click image > adjustments > curve.
In the graphic that appears, click and drag over the sloping line until you see your photo brighten up.

Do not move it too far because it will cause the photo to be too bright. Just use your heart and feelings.
If so, press OK.
Then save your photo
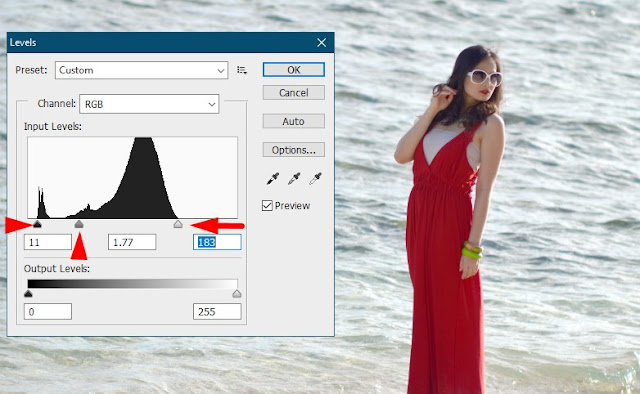
2. Levels
Open the photo in Photoshop, then click image > adjustments > levels.
In the options that appear, first slide the right slide towards the left towards the lowest point area of the curve.

See pictures for more details. If so, press OK then save your photo.
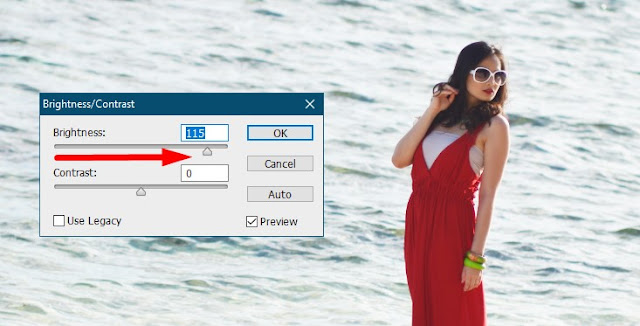
3. Brightness and contrast
Open your photo in Photoshop, then click image > adjustments > brightness and contrast.
In the window that appears, slide the brightness section to the right to brighten your photo as desired.

Then press OK, and save your photo.
4. Shadows/Highlights
Open your photo in Photoshop, then click image > adjustments > shadow/hightlight.
In the window that appears, tick show more options. 
Play only shadow area. Slide the slider until you get the appropriate photo brightness.
If so, press OK, then save your photo.
So that’s the Photoshop tool to brighten photos.
The above methods are the basic methods. Which will give the effect of brightness on the photo globally / thoroughly.
To get better results. It would be nice if you learn masking techniques in Photoshop.
Masking technique is a photo editing technique where we are free to determine the area we want to edit and not edit.
That way you can get better photos.
The final word
Tips if you get a dark photo next door, it’s a good idea for you to just take a photo again.
Because then the quality of the photos obtained will be much better than doing photo editing like this.
However, it should also be noted that the dark side photo is not always a bad photo.
For example, a portrait photo of a dark person’s face on the other side, it’s actually good because it gets a more dramatic effect.
Post a Comment for "4 Ways to Lighten a Dark Side-by-side Photo with Photoshop"