5+ How to Screenshot Windows 7,8,10 on Laptop & PC / Computer for Free
Want to know how to screenshot Windows versions 7, 8 & 10 using your laptop or computer? Don’t be confused, how to screenshot on Windows is quite easy.
Maybe my friend has seen in the FB group someone said this, try it on SS bro. What is SS? for those who don’t know SS = Screenshot.
For those of you who can’t take screenshots on a laptop or computer, Admin will explain here.
What are screenshots?
What is the definition of a screenshot? A screenshot is an action or a way of capturing a screen.
The screen that is captured in general has three parts, namely capturing the full screen, capturing the current screen and capturing a certain part of the screen.
Screenshoot itself is a feature that has been integrated on Windows 7, Windows 8, Windows 10 and possibly Windows systems.
This feature is very easy to use and very helpful for every Windows user, especially for tutorial makers like this admin hehehe.
How to Screenshot Windows On Laptop / Computer With Applications
There are two applications that can be used to take screenshots on Windows.
The application that is used by the admin is highly recommended for all of you because it has proven to be very useful.
How to Screenshot Windows 7, 8 & 10 On Laptops & Computers With the Snipping Tool Application
This application has been around since Windows XP was first introduced to the public, its size is very small and easy to use.
So making the screenshot (SS) process, whether it’s a full screen capture or only certain parts of what you want, is very easy.
This application is designed by Microsoft to run on all Windows Platforms that have .NET 4, starting from Windows XP, Windows Vista, Windows 7, Windows 8 and Windows 10.
For how to use Windows screenshots on laptops & computers with the Snipping Tool, try the following steps:
1. Click > Windows Start menu button then go to > Windows Accessories and select > Snipping Tool.

For a faster application search, my friend can directly select the search icon / search icon with a magnifying glass next to the Start button
Then just type the name of the application you are looking for and immediately the application you are looking for will be displayed.
2. Appearance > app Snipping Tool.
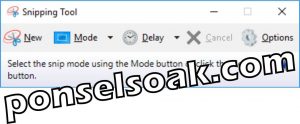
3. Choose > Mode.
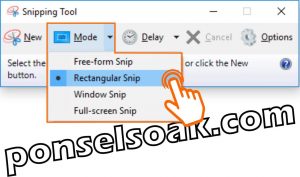
Explanation of the screenshot mode in the Snipping Tool application, Admin explains one by one the above modes:
- Free-form Snip, capture with this mode is free in accordance with what you want.
- Rectangular Snip, the capture of this mode can be square or rectangular depending on the object to be taken.
- Windows Snip, this capture mode gives the option to be able to capture the application that is currently open, for example if on the desktop there are 2 applications that are currently open then my friend can choose which application to capture.
- Full-screen Snip, this mode capture captures the full screen.
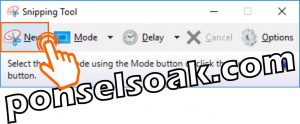
4. Select an option > New to start capturing the screen.
5. Here’s what the screenshot looks like.

After capturing the desired screen, you can directly save the capture and save it in PNG, GIF, JPEG and HTML file types, adjust to your needs.
How to Screenshot Windows 7, 8 & 10 On Laptop & Computer With PicPick App
This application is really good for friends who like screenshots for the needs of making PowerPoint presentations and tutorial makers like this admin.
The interface is very good, typical of Microsoft Office, even though the PicPick application is not made by Microsoft, but it feels very familiar when using this one application.
You could say this is Admin’s favorite application and highly recommended for all of you, the default features are the most complete among similar applications.
For how to use Windows screenshots on laptops & computers with the PicPick application, try the following steps:
1. Download and install > PicPick App Here. Run the application after it is installed.

2. To capture full screen select option > Full Screen.

3. Appearance of screenshots.
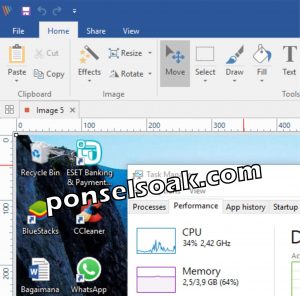
At first glance, it’s great to open the PicPick application, the features are also really good.
There are 8 screen capture modes that can be used, try to compare it with the Snipping Tool application which only has 4 modes.
There are also 7 Graphic Accessories features that you can use to maximize the screenshot editing process.
How to screenshot Windows on a laptop / computer without an application
The process of capturing the screen or Screenshoot (SS) can also be done using the keys on the keyboard.
To be able to do this, you don’t need an additional application, this function is already integrated in Windows XP, Vista, 7, 8 & Windows 10.
Each button used along with the key combination will produce a different screenshot and purpose.
From this feature is to directly capture the desired screen and can immediately be used on applications that are running without having to stop by third-party applications.
How to Screenshot Windows 7, 8 & 10 On Laptops & Computers With the Print Screen Button
This technique can be used in all lines of the Windows version, when the print screen button on the keyboard is pressed, the screen is captured in full and the copy process immediately occurs.
During the process the screenshots are temporarily stored in RAM as temporary storage memory.
And when you open the Paint application and press the paste icon, the screenshot results will be displayed.
For how to screenshot Windows on laptops & computers with the Print Screen button, try the following steps:
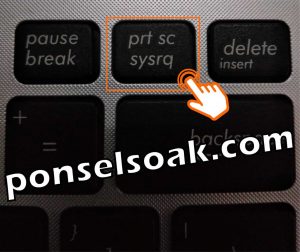
1. Press the key > Print Screen (prt sc sysrq) on the keyboard.
It’s usually in the top right corner, next to the delete button.
2. Open the application > Paint and select the icon option > Paste.
If you don’t know the Paint application, Paint itself is a default Windows application, so it’s definitely installed, you don’t need to download it anywhere.
Just click the Start / Windows icon (bottom left corner of your laptop / computer screen) then type in the “Paint” search field.
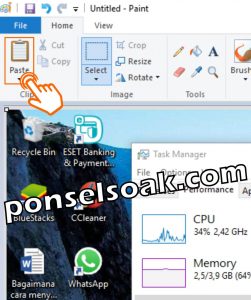
To be able to display screenshots, in addition to using the Paint application, you can also use other applications such as Microsoft Office Word, power point, etc.
How to Screenshot Windows 7, 8 & 10 On Laptops & Computers With Start Button + Print Screen
This key combination technique can only be done on Windows 8 and Windows 10, this is not because Microsoft has favored the previous Windows, but more for additional features.
Indeed, it can only be used on the latest Windows versions, when this technique is done what happens is that a screenshot (SS) process will automatically occur which is marked with a screen “monitor flashing“.
And immediately a folder called Screenshot was created in Pictures and in it was also created an image file of type PNG which was the result of the screenshot that was just done.
For a complete way to screenshot Windows on laptops & computers Start button + Print Screen, try the following steps:
1. Simultaneously press the > . key Start + Print Screen on the keyboard.

2. Then go to > File Explorer.
3. Select > Pictures (as illustrated below).
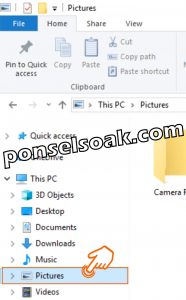
4. Double click the folder > Screenshots.
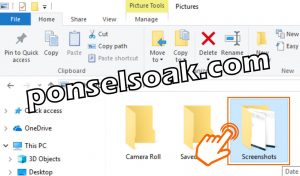
5. Here’s the screenshot that we took with the full screen.
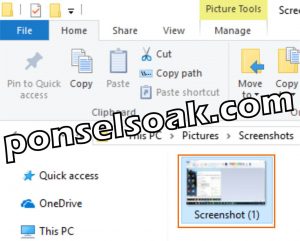
The screenshot process captures the full screen, a file is created named Screenshot (1).
When you repeat the steps above, the file names will be sorted automatically, it’s not easy.
How to Screenshot Windows 7, 8 & 10 On Laptops & Computers With ALT Key + Print Screen
The keyboard key combination ALT + Print Screen will capture the screen that is currently active or being used only, not full screen like the two steps above.
For example, my friend is running the Windows Media Player application, then only that application will be screenshotted while the star button to the clock and the icons on the taskbar will not be screenshotted.
For how to screenshot Windows on laptops & computers with the ALT + Print Screen key, try the following steps:
1. Press the combination key > ALT + Print Screen on the keyboard.

2. Open the app > Paint then select icon > Paste.
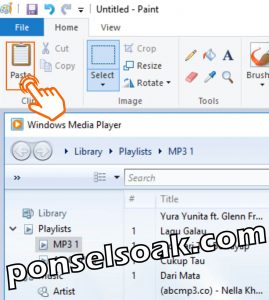
You don’t need to crop the screenshots anymore, because that’s definitely what you want.
You can also use other applications such as Microsoft Office Word, Power Point, etc. to paste screenshots.
Screenshot Tips On Windows 7, 8 & 10 Laptops & Computers With Applications And Without Applications
So, please remember for and when you want to take a screenshot on your laptop or computer.
- The Snipping Tool application supports storage of PNG, GIF, JPEG and HTML types.
- The PicPick application offers many features, even the most interesting thing is that screenshots can be added with text and watermarks.
- Another interesting feature of PicPick is that you can share screenshots to Facebook, Twitter and Skype.
- Without the hassle of copying and pasting and inputting screenshots, the PicPick application can directly input screenshots into Microsoft Office Word, Excel and Power Point.
So, those are some additional tips so that you can better master the applications that have been discussed above.
Oh yes, although there are 2 kinds of PicPick applications, namely free and paid, but the free version does not reduce the basic capabilities of the application.
Those were some of the ways that you can do to screenshot Windows 7, 8, 10 on a laptop or PC that we have summarized.
I hope tutorial How to Screenshot Windows 7,8,10 on Laptop & PC / Computer this can help mate.
Please also share this article on your social media. Good luck!
Post a Comment for "5+ How to Screenshot Windows 7,8,10 on Laptop & PC / Computer for Free"