2+ How to Change Photo Background in Paint & Make Your Own Photo
Want to know how to change the photo background on a computer with Paint software?
In everyday life we need a passport photo as a requirement to be included in the diploma, completeness of applying for a job, and others.
Usually, to get a passport photo we have to go to a photo studio.
Then when taking pictures the background will be adjusted according to our needs.
How to Change Photo Background with Paint Software on PC / Laptop
However, what if at some point we need a passport photo with a different background?
As for photos again need to pay.
We will give you a way to change the color background of the photo so you don’t have to bother going to the photo studio again.
How to Change the Background Color of a Photo in Paint
When you take photos in a photo studio, you will also get a passport photo in the form of photo printing according to the size you requested.
You will also get a softcopy of the photo file in the form of a CD. The photo softfile is what we need.
Move the photo into the laptop / PC, then follow the steps on how to change the background color for this photo.
For how to change the background color of a photo in Paint, try the following steps:
1. Open the app Paint contained in the PC.

2. Here’s the initial appearance of Paint.

3. Open the photo to be edited by clicking Open.
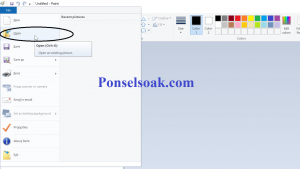
4. Select the photo, click Open.
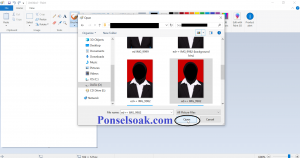
5. Click the bucket-shaped icon (Paint Bucket) or in the Paint Application it is called Fill with color.

6. Select the desired color, here is used the dark blue color that is already in the color selection box.

7. Point the cursor to the part to be changed color, click.
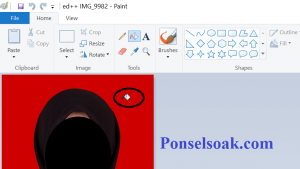
8. The result is as follows, you can still see the red line remaining on the edge of the photo.
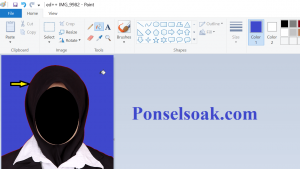
9. Use Zoom in to enlarge the photo to make it clearer.

10. Click on the icon Brushes, adjust the size and color.
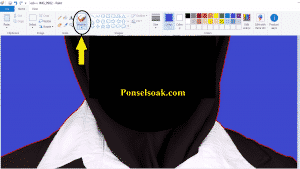
11. Apply to the part that is still red.
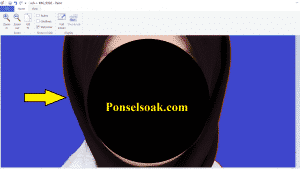
12. You can change the brush model as needed.
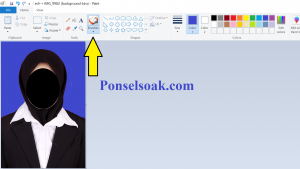
13. After the photo looks neat, save the photo by clicking File > Save as > Select the type of file you want.
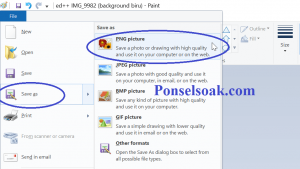
14. Here are the photos, the photos are ready to use.
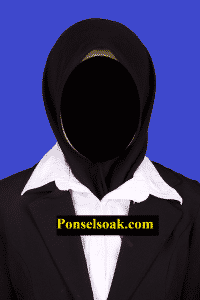
If you want to print it, just copy the photo to a flash disk or save it to a cellphone.
Then come to the photo studio to print according to the size of the photo you need.
You only need to pay for the printing service, and you don’t need to spend more money to re-photograph.
How to Change an Ordinary Photo Background to a Pas Photo
In addition, what if we absolutely don’t want to go to the photo studio to do a photoshoot?
It could be that at that time the finances were tight or the photo studio was queuing up while the passport photo was needed immediately.
We will show you how to make a passport photo from an ordinary photo by changing the background.
For how to change the background of a normal photo to a passport photo, try the following steps:
1. Open the app Paint, open the file to be edited.

2. Click Select > Select all > Slide the photo to remove the unused part.

3. The paint application does not have a crop feature, so you can change the size of the photo by clicking the lower right corner of the photo.
Adjust the size as desired.

4. To determine the area to be edited, click Select > Free-form Selection.

5. Shape according to the background shape, make sure the starting point meets the end point.
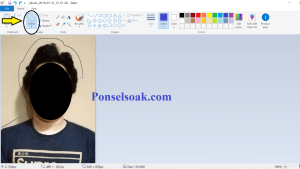
6. Click delete, then the result will be as follows.
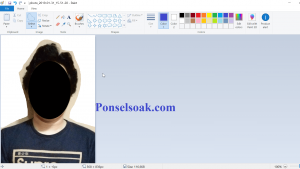
7. Use Paint Bucket like the previous way to change the color to blue.

8. Trim the edges of the photo using Brushes.
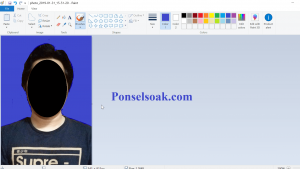
9. Save the finished photo, the photo is ready to use.

Make sure the clothes you use match the requirements for the photo you are going to make.
For example, for a diploma photo, you must use a suit, or if you take a regular photo, try to use a shirt to make it look neat.
Our advice, take a photo with a plain background like on a wall or by spreading a plain cloth as a background.
This makes it easier for you to edit the photo.
Can You Print Your Own Photo Pass?
Yes, you can print your own photos with the printer you have, or on a computer rental using photo paper.
Photo paper can be found at stationery stores.
When printing photos, first set the photo size to suit your needs.
We will provide a list of standard photo sizes.
| Photo Size | CM unit | Inch |
| 2 x 3 | 2.16 x 2.79 | 0.85 x 1.1 |
| 3 x 4 | 2.79 x 3.81 | 1.1 x 1.5 |
| 4 x 6 | 3.81 x 5.59 | 1.5 x 2.2 |
Those were some of the ways you can do to change the photo background in Paint & make your own Photo Pass.
Hopefully this tutorial on How to Change Photo Background in Paint can help you all.
Please also share this article on your social media. Good luck!
Post a Comment for "2+ How to Change Photo Background in Paint & Make Your Own Photo"