How to Make a Photo Set on Shutterstock
 |
| My photo set on ShutterStock |
This is important, if you have never done it before, you should do it now.
Why?
For example, you have 1000 stock photos on shutterstock which contain photos of landscapes, flowers, people, food. If you look at the shutterstock profile page, it will definitely look random, especially if the upload method is random.
To make it neater, we put the photos into a specific set.
There are several benefits that can be obtained after creating a set of certain categories of photos/works, such as
- Photos become neater, nice to look at
- Not overwhelmed when searching for a specific photo
- Useful for visitors
- For those who already have a lot of photos that sell well, can place them in certain sets and be named best sellers, this will definitely increase the sales and credibility of your account in the eyes of prospective shutter stock buyers.
Of the several benefits above, it is highly recommended to make a set long before your portfolio grows. Imagine if you already have more than 100,000 photos later, it must be a headache to organize them.
Here’s how to make a set on Shutterstock
- Login to your shutterstock account if you haven’t already click here to register for shutterstock. Read also how to register the guide here.
- On the dashboard page, select portfolio >> catalog manager

- On the top right, press the red button that says Create Set
- Type the desired set name. For example, “trees” because we want to include photos of trees there.

- In the left pane you will see the set you have created. Then select the photos you want to include in the set.
- Once selected, click add to set in the upper right, then select the set that was created earlier.

- Photos will automatically appear in the set that has been created.

- Finished.
Change the cover set on Shutterstock to make it even cooler
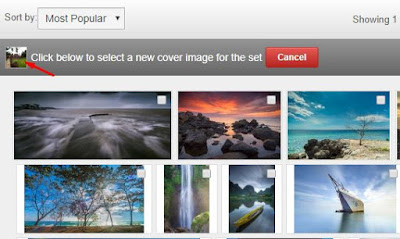
After creating the sets, automatically the first photo to be included in the set will be the cover of that set. If you don’t like it, you can replace it with another photo in the cover.
It’s like this
1. Enter the set you want to change the cover
2. At the top left there is a photo that is a photo of the cover set, press the photo once and then select the photo you want to use as the latest cover set.

3. Done.
To view it, please open your account via
https://www. shutterstock. com/g/your-ss-username/sets
or through the ShutterStock application that you have installed on your cellphone.
Notes to remember
Each shutterstock page that displays a maximum of 100 photos. Make sure you have checked or entered the photos you want into the set you choose before moving on to the next page.
You can add 1 photo to more than 1 set.
Photos that have been approved, if they are included in the set, it does not affect the front page of your portfolio. You can still sort them by the newest, oldest, or most popular photos.
Photos that have been included in the set are not “moved” but only like “tags”.
You can delete photos in a set, then move them to another set.
Sets can also be deleted. If the set is deleted / delete it will not delete the photos in your gallery. The photo is still there.
The final word
That’s how to set up your shutterstock account.
Please create sets based on the specific categories you manage in your account. And hopefully selling your photos/vectors/works is always in demand.
Post a Comment for "How to Make a Photo Set on Shutterstock"